Hi Guys,
I have found a very helpful youtube video about disk partitioning. Have a look !! Thanks goes to “ProgrammingKnowledge” youtube channel.
Hi Guys,
I have found a very helpful youtube video about disk partitioning. Have a look !! Thanks goes to “ProgrammingKnowledge” youtube channel.
Boundary Value Analysis is testing inputs at the boundaries. By testing boundary values, we can reduce the chances of occurring error at initial stages.
Assume that there is a comment section on an application which we can enter characters only up to 30 characters.
We can test character length at the boundaries.
Equivalence Partitioning is dividing the input data into partitions of equivalent data. Here, this technique can be used to reduce the number of tests.

Decision Table technique is based on different conditions that we can identify for a scenario.

**Disclaimer – As a Trainee Quality Assurance Engineer , I am sharing some of my knowledge I got from training sessions. Feel free to add your knowledge regarding UI Automation. 🙂
This publication is based on Selenium Web Driver .
Below instructions are based on,
Configuring Windows Environment variables
1) Jdk and JAVA_HOME

Ref : https://www3.ntu.edu.sg/home/ehchua/programming/howto/JDK_Howto.html
Add JAVA_HOME variable as a Windows Environment Variable
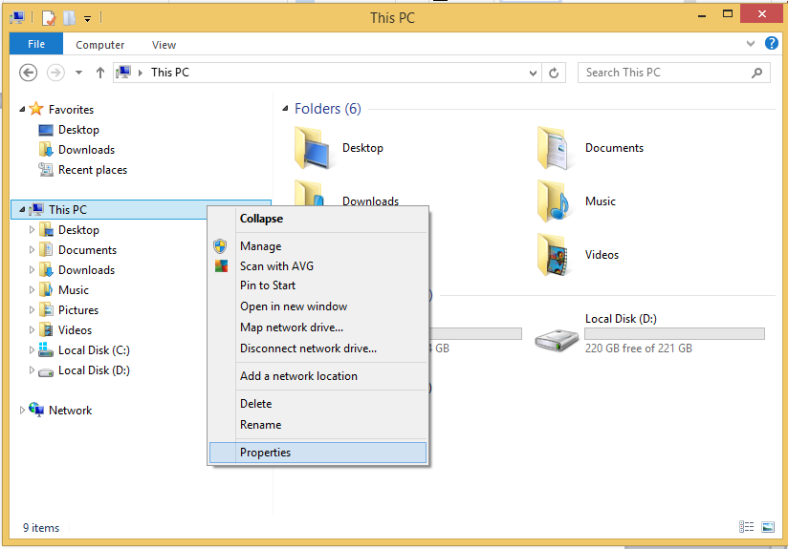
Click on Advanced Column
Click on Environment variables
Click on “new” button which is under System Variables
Create JAVA_HOME variable and Copy and paste jdk path from the relevant folder in your machine.

Click on ‘OK’ on in Environment Variable GUI

Jdk path
2) Install Apache Maven
First of all download and copy MAVEN zip file and Eclipse Neon folder from the given url and Paste it in a newly created folder in your desktop.
Copy downloaded folders:- [Your downloads ]

3) Add M2_HOME and MAVEN_HOME variables as Windows Environment variables
What is the purpose of adding M2_HOME and MAVEN_HOME variables when installing Apache Maven?
[Same steps of instructions when adding JAVA_HOME variable include in both M2_HOME and MAVEN_HOME ]
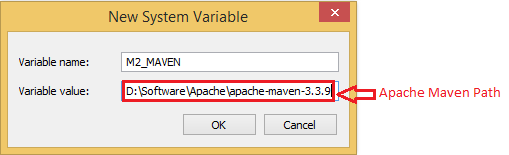

Click on ‘OK’ on in Environment Variable GUI
Note:- Adding M2_HOME variable is enough to point to the Maven Project that unzipped earlier but some programs still reference Maven folder with MAVEN_HOME variable. Therefore, it is safer to add both variables at this point itself.
4) Add PATH
To append Maven Bin Folder- %M2_HOME%\bin

Existing Path variable :-
C:\ProgramData\Oracle\Java\javapath;%SystemRoot%\system32;%SystemRoot%;%SystemRoot%\System32\Wbem;%SYSTEMROOT%\System32\WindowsPowerShell\v1.0\;C:\Program Files (x86)\Skype\Phone\
Update the Path variable:-
C:\ProgramData\Oracle\Java\javapath;%SystemRoot%\system32;%SystemRoot%;%SystemRoot%\System32\Wbem;%SYSTEMROOT%\System32\WindowsPowerShell\v1.0\;%M2_HOME%\bin;C:\Program Files (x86)\Skype\Phone\
Once the process is completed correctly up to this point, Apache Maven should installed successfully.
5) Verification

1.Double click on Eclipse installer
Take the previously downloaded Eclipse setup.


3. Click on Install
4. Once the installation is done, Launch Eclipse .
5. Then , a workplace has to give before working on Eclipse IDE

6. Click on “OK”
Instructions :

Click on Maven Project

Click on “Next”

Select the artifact -> maven-archetype-quick start
10, Select “Next”


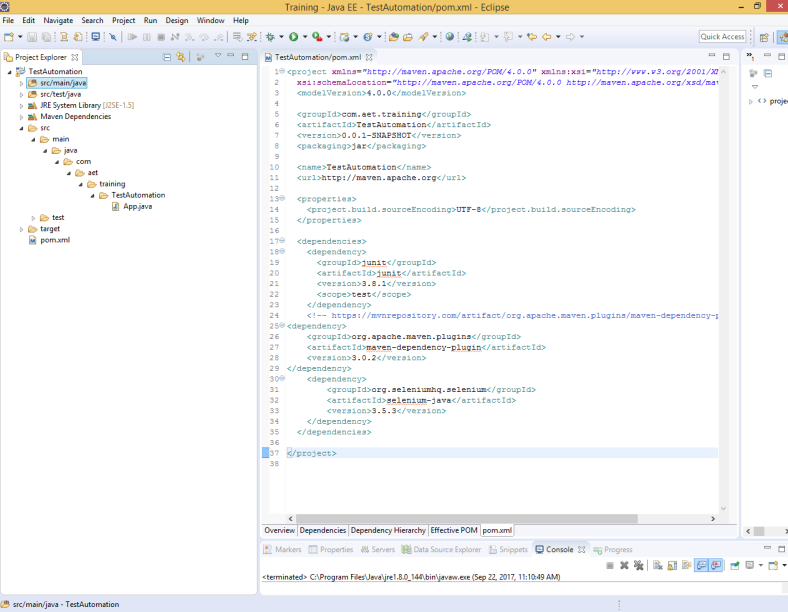
Hierarchy of the project
Once the above steps are done successfully, The project hierarchy can be seen as below.

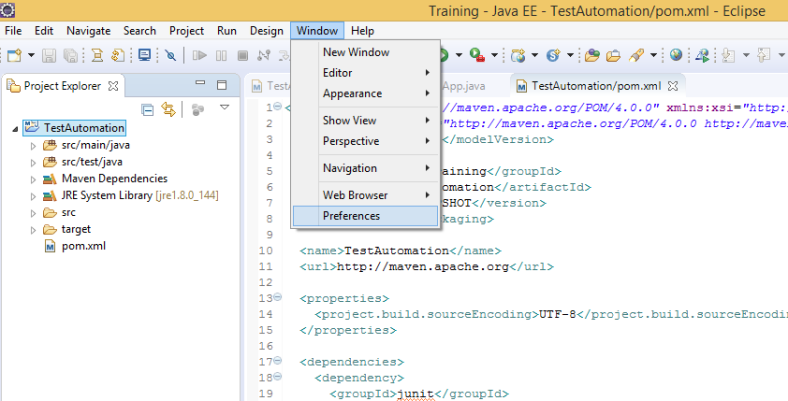
Adding Dependencies
Dependencies->
<dependencies>
<dependency>
<groupId>junit</groupId>
<artifactId>junit</artifactId>
<version>3.8.1</version>
<scope>test</scope>
</dependency>
<!– https://mvnrepository.com/artifact/org.apache.maven.plugins/maven-dependency-plugin –>
<dependency>
<groupId>org.apache.maven.plugins</groupId>
<artifactId>maven-dependency-plugin</artifactId>
<version>3.0.2</version>
</dependency>
<dependency>
<groupId>org.seleniumhq.selenium</groupId>
<artifactId>selenium-java</artifactId>
<version>3.5.3</version>
</dependency>
</dependencies>

Select JRE System Library

Click on “Finish”

Default JRE s

Click on ‘OK’
 4. Then select Maven install
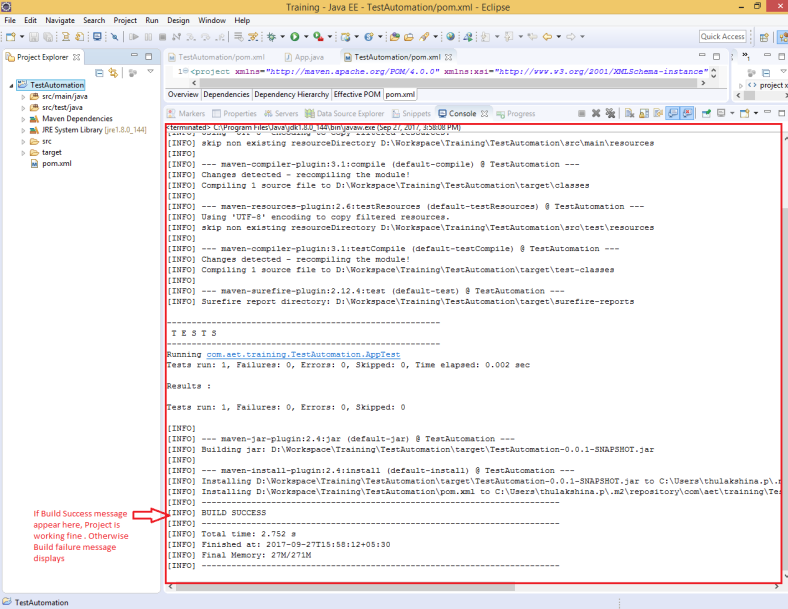
If Build failure message displays after Maven Install
[1.8 is checked according to this report]

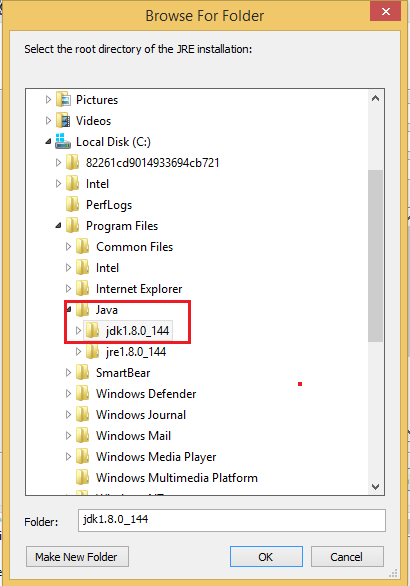
If the compiler compliance level is equivalent to java version installed, Then check whether JRE path is set correctly.

If not, Select directory and choose the correct path

7.Click on ‘OK’
References
[2]”How to install Maven on Windows”, Mkyong.com, 2017. [Online]. Available: https://www.mkyong.com/maven/how-to-install-maven-in-windows/. [Accessed: 22- Sep- 2017].
*Hi,feel free to share your knowledge related to The Introduction to Economics 🙂
1)Why we need to know Economics and Management as IT Professionals?
2)How are we use this knowledge?
*Hi, feel free to share your ideas and knowledge related to the software processes 🙂
1)What is a process?
2)What is a software process?
3)Why we need a software process?
4)What are the activities involved in software development?
Hi, feel free to share your ideas and knowledge related to the software processes 🙂
1)What is Software quality?
2)What is Ethics?
3)What is Engineering?
Continue reading “Introduction to Software Engineering and Ethics.”

